0%

하드 코딩된 HTML 마크업

1
2
3
4
5
6
7
8
9
10
11
<!-- Actual DOM Node : Container -->
<div class="app" lang="en">
<h1 class="app__headline">
React
<abbr title="Application Programming Interface">API</abbr>
</h1>
<ul class="app__list list--api">
<li>React</li>
<li>ReactDOM</li>
</ul>
</div>

DOM API - Actual DOM Tree 로 변경

1
2
3
4
5
6
7
8
9
10
11
12
13
14
15
16
17
18
19
20
21
22
23
24
25
26
27
<!-- Programming DOM Script : Actual DOM Tree-->
<div id="root"></div>

<script>
const rootNode = document.getElementById('root');
{
const abbrNode = document.createElement('abbr');
abbrNode.setAttribute('title', 'Application Programming Interface');

const abbrContent = document.createTextNode('API');
abbrNode.appendChild(abbrContent);

const headingNode = document.createElement('h1');
headingNode.insertAdjacentText('beforeend', 'React');
headingNode.insertAdjacentText('beforeend', ' ');
headingNode.insertAdjacentElement('beforeend', abbrNode);

const appNode = document.createElement('div');
appNode.classList.add('app');
appNode.setAttribute('lang', 'en');
appNode.insertAdjacentElement('beforeend', headingNode);

console.dir(appNode);

rootNode.appendChild(appNode);
}
</script>
  • console.dir(appNode); → 실제 DOM 노드

React API - Virtual DOM Tree 로 변경

CDN : React Library → React.createElement(), React.forwardRef() 등…

React 앱을 구성하는 가상 DOM을 생성하는 API

1
<script src="//unpkg.com/react/umd/react.development.js" crossorigin></script>

React.create.Element()

1
2
3
4
5
React.createElement(
type,
[props],
[...children]
)
1
2
3
4
5
6
const appElement = React.createElement(
'div',
{ className: 'app', lang: 'en' },
headingElement,
listElement
);

인자로 주어지는 타입에 따라 새로운 React Element를 생성하여 반환한다.

  • type 인자로는 HTML Standards Component를 문자열로 입력한다. 혹은 React 컴포넌트 타입이나 React Fragment 타입 중 하나가 올 수도 있다.
  • props는 반드시 object(객체) 타입이어야 한다.
  • children은 null 또는 undefined 또는 React.ReactNode 타입이다.

React 최상위 API - React

1
2
3
4
5
6
7
8
9
10
11
12
13
14
15
16
17
18
19
20
21
22
23
24
25
// React element 생성
const headingElement = React.createElement(
'h1',
{ className: 'app__headline' },
'React',
' ',
React.createElement('abbr', { title: 'Application Programming Interface', children: 'API' })
);

const listElement = React.createElement('ul', {
className: 'app__list list--api',
children: [
React.createElement('li', null, 'React'),
React.createElement('li', null, 'ReactDOM')
]
});

const appElement = React.createElement(
'div',
{ className: 'app', lang: 'en' },
headingElement,
listElement
);

console.log(appElement)
  • console.log(appElement) → **가상 DOM 노드 = 그냥 “객체”**이다.

    • {$$typeof: Symbol(react.element), type: “div”, key: null, ref: null, props: {…}, …}

      $$typeof: Symbol(react.element)
      props: {className: “app”, lang: “en”, children: Array(2)}
      children: Array(2)
      0: {$$typeof: Symbol(react.element), type: “h1”, key: null, ref: null, props: {…}, …}
      1: {$$typeof: Symbol(react.element), type: “ul”, key: null, ref: null, props: {…}, …}
      length: 2
      className: “app”
      lang: “en”
      type: “div”

실제 DOM 노드 VS 가상 DOM 노드

실제 DOM 노드는 아주 많은 속성들이 있었는데 react의 가상 DOM 노드는 심플한 객체이다.

= 불필요한 건 빼고 필요한 것들로만 객체를 만들었다. = 추상화를 했다.

= 그래서 더 빠르나 실제 DOM이 아니기 때문에 변환과정(= render()함수를 사용)이 필요하다.

실제 DOM 으로 변환

= 생성한 가상 DOM 노드를 렌더링하기 위해 아래의 API를 추가하여 render()함수를 사용한다.

CDN: ReactDOM Library → ReactDOM.render()

React에 의해 구성된 앱(가상 DOM)을 실제 DOM에 렌더링 되도록하는 API

(비교 | CDN: React Library - React 앱을 구성하는 가상 DOM을 생성하는 API)

1
<script src="//unpkg.com/react-dom/umd/react-dom.development.js" crossorigin></script>

React 최상위 API - React

ReactDOM.render()

가상 DOM Tree(React 루트 요소)를 실제 DOM에 마운트(Mount)하여 렌더링(Rendering)한다.

1
ReactDOM.render(element, container[, callback])
1
2
3
// vNode → 가상 DOM Tree (React 요소로 구성)
// domNode → 실제(actual) DOM 노드
ReactDOM.render(vNode, domNode);
1
render(appElement, rootNode);

ReactDOM - React

우클릭 > 페이지 소스 보기

페이지 소스 보기에서는 < div id=”root” >< / > 안에 아무것도 없다.

= 즉, 검색봇이 크롤링을 할 때 좋지 않다.

= 검색 엔진 최적화X

Babel Standlone.

ES6+ 문법의 경우, ES6+ 문법을 지원하지 않는 브라우저에서는 깨질 수 있다.

그래서 node.js에서 Babel을 사용해서 버전을 내려주었다.

Babel Standalone 을 사용하면, 웹 브라우저 환경에서 버전을 내려줄 수 있다.

Babel 컴파일러가 실시간 컴파일 하도록 Bable의 독립형 빌드를 제공하기 때문.

1
<script src="https://unpkg.com/babel-standalone/babel.min.js" crossorigin></script>

@babel/standalone · Babel

위 코드를 불러오기만 한다고 컴파일되지는 않는다.

아래와 같이 < script >태그에 bind type을 지정해서 컴파일할 코드를 지정해줘야한다.

왜? 효율적으로 관리하기 위해서 바꿔주고자 하는 코드가 어떤 건지 식별할 수 있어야하기 때문.

bind type으로 text/babel 또는 text/jsx 타입이 적용하면,

브라우저에 로드될 때, Bablel Standalone이 해당 스크립트 태그들 모두를 컴파일 하고 실행한다.

(표준에서 bind type은 text/ecmascript 나 text/javasctipt )

1
<script type="text/babel"></>

브라우저에서 결과를 확인하면 < head > 영역에 없던 < script > 태그가 생겨있다.

< script >태그 안에서 Babel이 컴파일한 결과 코드를 볼 수 있다.

ES6+의 문법이 그 아래 버전으로 변환되어 있는 것을 확인할 수 있다.

변환은 브라우저가 렌더링될 때 실시간으로 컴파일된다.

! 브라우저에서 Babel을 사용하면 아래와 같은 경고가 출력된다.

서비스를 생산할 때 Babel을 이용할 경우, 일반적으로 Babel Standalone은 권장되지 않기 때문.

왜? 느리기 때문.

대신 Webpack 같은 Node.js에서 실행되는 빌드 시스템을 사용해 JavaScript를 사전에 미리 컴파일 해야한다.

그럼 언제 사용해야하나? (바벨 공식문서 - When (not) to use @babel/standalone 에 나와있다.)

브라우저에서 Babel 사용 시 경고( = babel standalone 사용 시)

CDN: ReactDOMServer Library → ReactDOMServer.renderToString(), renderToStaticMarkup() 등…

실제 DOM에 렌더링 하는 대신, 서버에서 React 앱을 렌더링 하기 위한 API

(클라이언트에서는 쓸 일이 없고 express 서버 등 서버쪽에서 렌더링을 할 때 필요하다. )

1
<script src="//unpkg.com/react-dom/umd/react-dom-server.browser.development.js" crossorigin></>

ReactDOMServer - React

ReactDOMServer.renderToStaticMarkup()

서버에서 렌더링할 때 사용하므로, 서버에서 렌더링 된 결과를 클라이언트로 보내기 위해

React 객체를 HTML String 값으로 변환한다.

= 문자로 만드는 것이 목표

?????renderToString()과 비슷하지만 내부적으로 React의 고유한 key 등을 포함하고 있어 순수한 HTML String값으로 반환된다.?????

1
2
3
// ReactDOMServer API
const { renderToStaticMarkup } = ReactDOMServer;
console.log(renderToStaticMarkup(appElement));

appElement를 renderToStaticMarkup() 메서드를 이용해 텍스트로 변환하면 아래와 같은 HTML String 값이 반환된다.

= 가상 노드가 실제 노드로 변경된 후 텍스트로 변환된 것

= HTML String 값

1
2
3
4
5
6
7
8
9
10
<div class="app" lang="en">
<h1 class="app__headline">
React
<abbr title="Application Programming Interface">API</abbr>
</h1>
<ul class="app__list list--api">
<li>React</li>
<li>ReactDOM</li>
</ul>
</div>

JSX

JSX는 ECMAScript에서 사용할 수 있는 XML과 유사한 구문 확장

ECMAScript 표준에 통합하지는 제안은 아니다.

= 그런 측면에서 React에서 사용한다.

= ES6+에서 기본 표현식(Primary Expression)을 확장한 자바스크립트의 식이다.

= ES6+ 미만에서는 babel이 필요(지금은 babel standalone 사용하니 괜찮다.)

= < Dropdown >, < Menu >, < MenuItem > 등 개발자가 만든 컴포넌트를 이용한다.

xml 유형의 문법이라서 self closing을 꼭 해야한다. 안 하면 오류이다. 그런데 React가 알려준다.

엔진이나 브라우저에서 구현하기 위한 것이 아니다.

(JSX, Jest, React 다 facebook에서 만들었다.)

JSX is an XML-like syntax extension to ECMAScript without any defined semantics. It’s NOT intended to be implemented by engines or browsers. It’s NOT a proposal to incorporate JSX into the ECMAScript spec itself. It’s intended to be used by various preprocessors (transpilers) to transform these tokens into standard ECMAScript.

JSX | XML-like syntax extension to ECMAScript

1
2
3
4
5
6
7
8
9
10
11
12
// Using JSX to express UI components.
var dropdown =
<Dropdown>
A dropdown list
<Menu>
<MenuItem>Do Something</MenuItem>
<MenuItem>Do Something Fun!</MenuItem>
<MenuItem>Do Something Else</MenuItem>
</Menu>
</Dropdown>;

render(dropdown);

JSX 로 변경

1
2
3
4
5
6
7
8
9
10
11
render(
<div className='app' lang='en' /* 여기에도 주석 삽입 가능 */>
{headingElement}
{listElement}
{/* 괄호 안은 JS로 동작하므로 이렇게 주석을 달아야 한다. */}
</div>,
rootNode,
() => {
console.log('React VDOM Tree with JSX-> render -> Actual DOM Mount');
}
);
  • < div ~ >~< / > 는 자바스크립트의 식이지 HTML template이 아니다.
    = class가 아니라 className을 써야한다.

  • headingElement와 listElement가 {} 보간에 의해 app JSX에 끼워넣어진 것이다.

  • {} 는 React에서 JSX를 사용할 때, 다른 컨텐츠를 끼워넣기 위해 사용하는 보간(Interpolation)

    여기서 {} 안은 JS로 동작한다.

    (마치 JavaScript에서 ``(백틱)을 사용할 때, 다른 컨텐츠를 끼워넣기 위한 보간인 ${}과 같다.)

  • <></>와 같이 fragment로 감싸줄 수 있는 데 이는 뒤에서 자세히 설명한다.

  • JSX에서 {false}, {null}, {undefined} 등 0을 제외한 falsy한 값은 렌더링 시 아무 것도 나타나지 않는다.

  • JSX에서 &&(엔드 연산자)와 삼항 연산자를 이용해 조건부 렌더링이 가능하다.

    • { isTrue && < div >< /> }
    • < div >{ isTrue ? ‘true다’ : ‘false다.’ }< />

babel이 JSX인 위 코드를 아래와 같이 React API로 변경해준다.

1
2
3
4
5
6
7
render(
React.createElement('div', { className: 'app', lang: 'en' }, headingElement, listElement),
rootNode,
function () {
console.log('React VDOM Tree with JSX-> render -> Actual DOM Mount');
}
);

JSX : React VDOM Tree -> render -> Actual DOM Mount

1
2
3
4
5
6
7
8
9
10
11
12
13
14
15
16
17
18
19
20
21
22
function App(props /* { frameworkName, style } */) {
return (
<div classname='app' lang='en' style={props.style}>
<h1 className='app__headline'>
React <abbr title='Application Programming Interface'>API</abbr>
</h1>
<ul className='app__list list--api'>
<li>React</li>
<li>ReactDOM</li>
</ul>
</div>
);
}
// React VDOM Tree → render → Actual DOM Mount
render(
// React.createElement(App, { frameworkName: 'React', count: 12 }),
<App
frameworkName='React'
style={{ border: '6px solid currentColor', padding: '2rem 4rem' }}
/>,
rootNode
);

문제 링크

프로그래머스 위클리 테스트 21년 8월 3주차

블록 모양 추출

1
2
3
4
5
6
7
8
9
10
11
12
13
14
15
16
17
18
19
20
21
22
23
24
25
26
27
28
29
30
31
32
33
34
35
36
37
38
39
40
41
42
43
44
45
46
47
48
49
50
51
52
53
54
55
56
57
58
59
60
61
62
63
64
65
66
67
68
69
70
71
72
73
74
75
76
77
78
79
80
81
82
83
84
85
86
87
88
89
90
91
92
93
```


## 전체 정답코드

```javascript
const dx = [1, 0, -1, 0];
const dy = [0, 1, 0, -1];

const getBundle = (arr, x, y, value) => {
const bundle = [];
const _x = x;
const _y = y;
const recur = (x, y, value) => {
if (arr[x][y] !== value) return;

bundle.push([x - _x, y - _y]);

arr[x][y] = value ? 0 : 1;

for (let i = 0; i < 4; i++) {
const nx = x + dx[i];
const ny = y + dy[i];
if (
nx >= 0 &&
nx < arr.length &&
ny >= 0 &&
ny < arr.length &&
arr[nx][ny] === value
) {
recur(nx, ny, value);
}
}
};
recur(x, y, value);

return bundle.sort();
};

const findBundles = (arr, value) => {
const bundles = [];
for (let i = 0; i < arr.length; i++) {
for (let j = 0; j < arr.length; j++) {
if (arr[i][j] === value) {
bundles.push(getBundle(arr, i, j, value));
}
}
}
return bundles;
};

const getRotatedBunbles = bundle => {
const bundles = [bundle];
for (let i = 0; i < 3; i++) {
bundles.push(
bundles[bundles.length - 1].map(([x, y]) => [-y || 0, x]).sort()
);
}
return bundles;
};

const mediateBundle = bundle => {
const [row, col] = bundle.reduce(
(acc, cur) => [Math.min(acc[0], cur[0]), Math.min(acc[1], cur[1])],
[Number.MAX_SAFE_INTEGER, Number.MAX_SAFE_INTEGER]
);
return bundle
.map(([r, c]) => [row < 0 ? r - row : r, col < 0 ? c - col : c])
.sort();
};

function solution(game_board, table) {
const blockBundles = findBundles(table, 1)
.map(bundle => getRotatedBunbles(bundle))
.map(rotatedBundle => rotatedBundle.map(bundle => mediateBundle(bundle)))
.map(rotatedBundle => rotatedBundle.map(bundle => bundle.flat().join('')));

const blankBundles = findBundles(game_board, 0).map(bundle =>
mediateBundle(bundle).flat().join('')
);

let answer = 0;
blankBundles.forEach(bundle => {
for (let i = 0; i < blockBundles.length; i++) {
if (blockBundles[i].includes(bundle)) {
blockBundles.splice(i, 1);
answer += Math.floor(bundle.length / 2);
break;
}
}
});
return answer;
}

Loaders

  • webpack은 기본적으로 JavaScript와 JSON 파일만 이해한다.
  • Loaders를 사용하면 webpack이 다른 유형의 파일을 처리할 수 있다.
  • // 또한 다른 유형의 파일들을 유효한 모듈로 변환하여 애플리케이션에서 사용하거나 디펜던시 그래프에 추가한다.

Plugins

  • 번들을 최적화하거나, 에셋을 관리하고, 또 환경 변수 주입 등과 같은 광범위한 작업을 수행할 수 있다.
  • 플러그인을 사용하려면 require()를 통해 플러그인을 요청하고 plugins 배열에 추가해야 한다.
  • 대부분의 플러그인은 옵션을 통해 사용자가 지정할 수 있다.
  • webpack은 설치 없이 사용할 수 있는 플러그인들을 제공한다.

결론

Loaders는 다른 유형의 파일을 처리하기 위해,
Plugins는 번들 최적화, 에셋 관리, 환경 변수 주입 등 광범위한 작업 수행
// 써보면서 추가해야할 듯

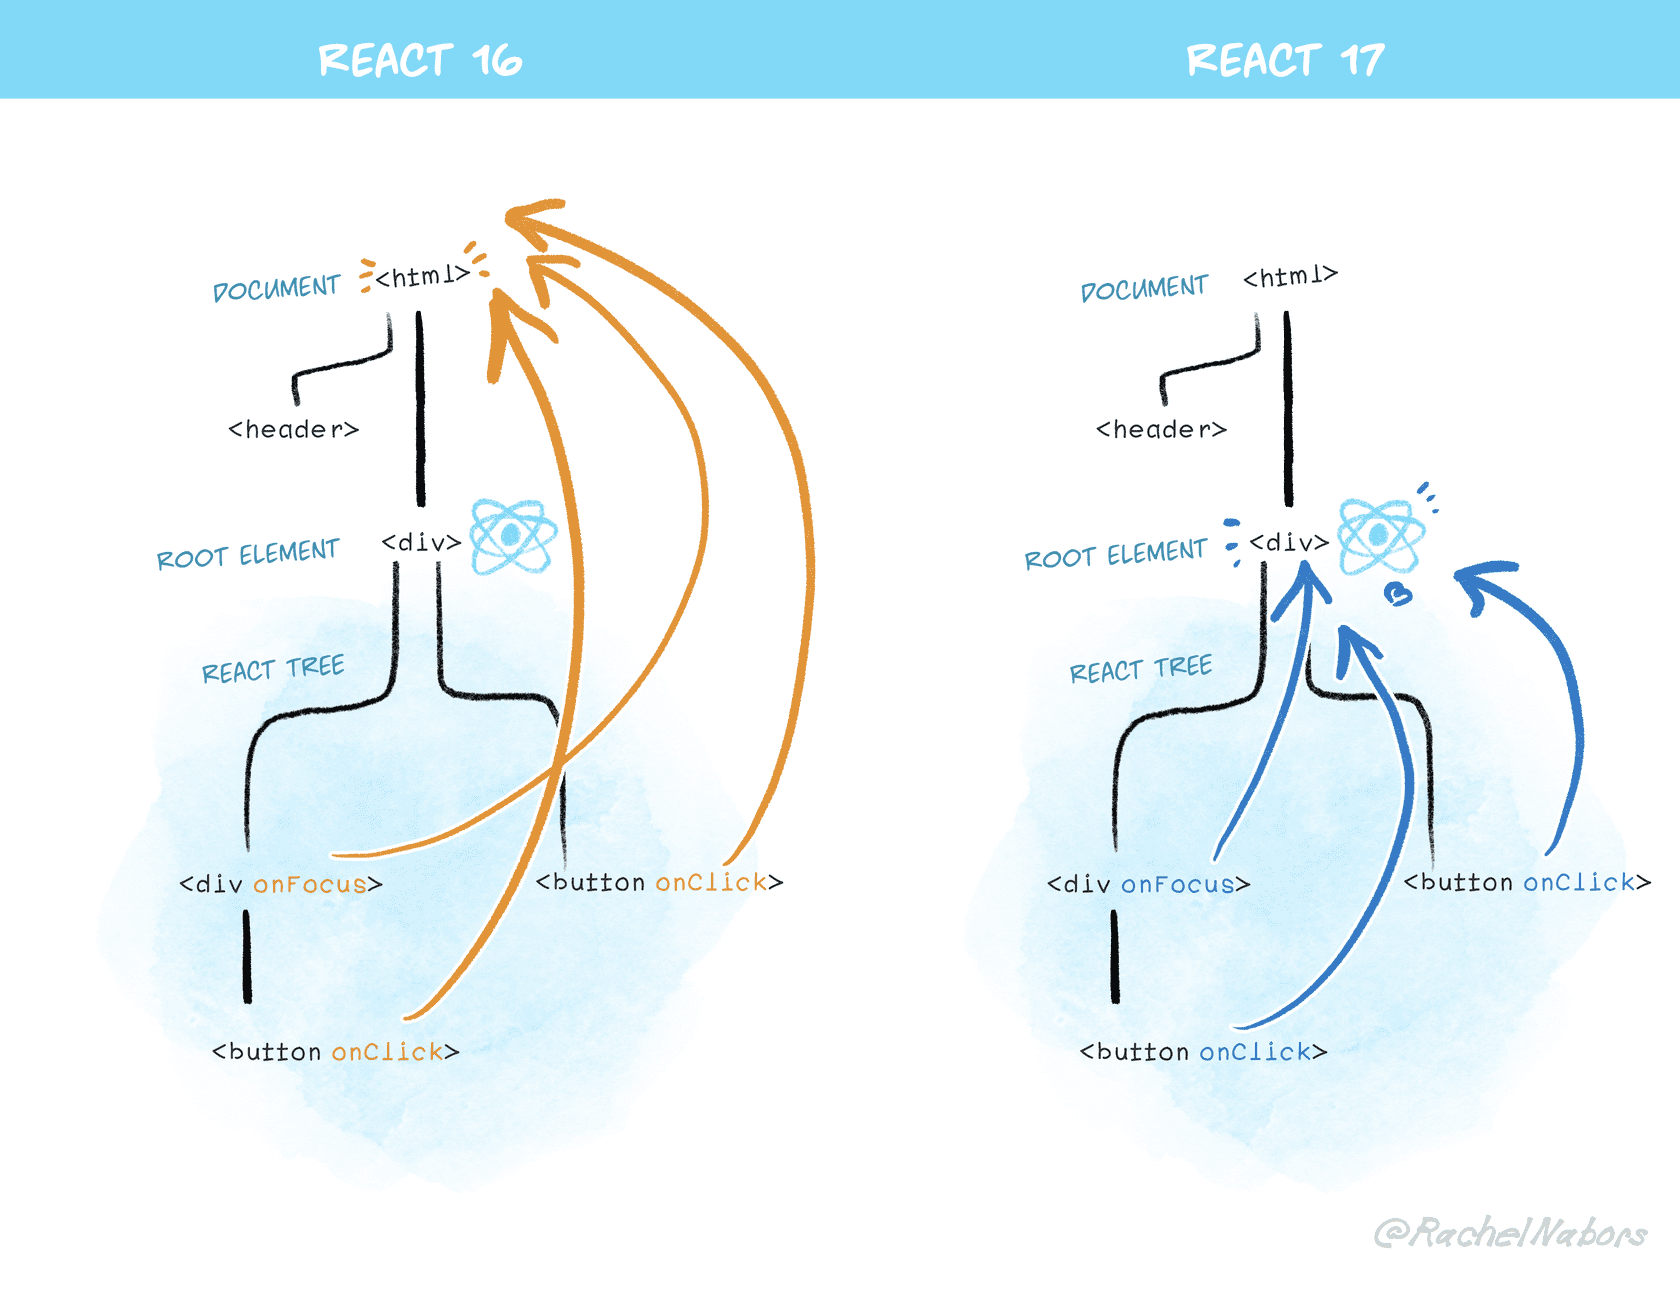
정리이유

변경된 리액트 이벤트 시스템 방식이 어떤 이점이 있는지 이해가 가지 않았어서 이해 후 정리.

변경된 React 이벤트 시스템 방식

변경된 React 이벤트 시스템 방식 @RachelNabors

1
2
3
4
5
6
 <body>
<div id="root1"></div>
<div id="root2"></div>
<div id="root3"></div>
<div id="root4"></div>
</body>

위와 같이 root가 여러 개가 있을 때 각 root에서 다른 버전의 React를 쓰는 경우, 바뀐 방식에서 문제가 개선되었다.

함께 본 자료

React의 합성 이벤트의 이점

nativeEvent는 브라우저가 제어하는 브라우저의 이벤트이고, 합성 이벤트는 React가 제어하는 React의 이벤트이다.
React가 내부적으로 발생할 수 있는 문제들을 해결해주어 크로스브라우징 고려 등 개발자의 입장에서 고려해야할 사항들을 처리해주는 이점이 있다.

정리 이유

뭐가 다른 지 잘 모르겠어서 확실하게 이해하기 위해 정리

StopPropagation()

이벤트 전파를 중지시킨다.

preventDefault()

DOM 요소의 기본 동작을 중지시킨다.
예) a 요소를 클릭하면 href 어트리뷰트에 지정된 링크로 이동, checkbox 또는 radio 요소를 클릭하면 체크 또는 해제